Mark 1 Prototype

The Mark 1 Prototype takes your idea from concept through to reality. Previous design work will have worked out the design in theory. Early proof of principle prototypes will have proved the core functionality of mechanisms and test specific areas of the product. Feedback from users and testing will have led to refinements and the Mark 1 prototype is the first full prototype which brings the whole design to life. It is made from the intended materials, rather than using stock or substitutions, and with the beginnings of styling applied, it starts to develop the aesthetics.
Our Process
Reviewing and Sourcing
1. Review design work
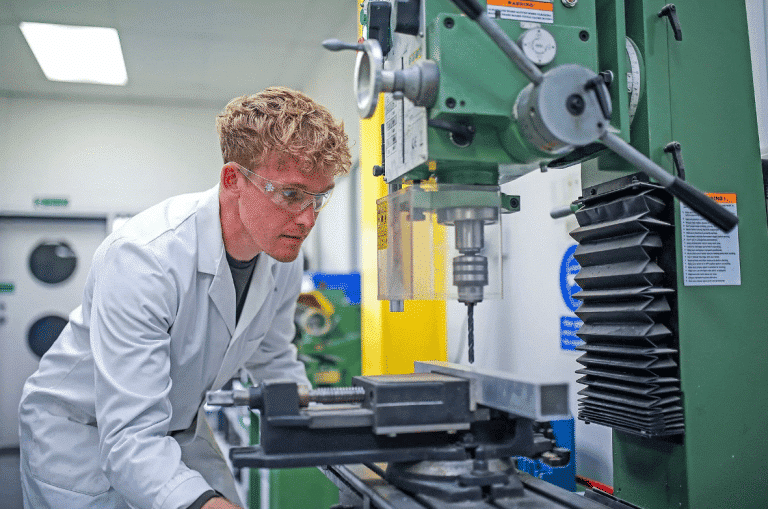
Any changes or feedback discussed in between the previous stage of work and starting the mark 1 prototype will be applied to CAD or design. On the hard goods side, this may include test printing these parts in house to check these changes haven’t affected their functionality or the rest of the assembly.
2. Sourcing and ordering external parts
On the textile side, the intended material palette will be sourced including the correct fabrics, trims and components. This may include contacting factories for samples if they aren’t available off the shelf or researching new techniques if new materials or processes are being used. If third parties are being used to produce elements of the prototype such as custom printed labels or laser etched badges, then they will be contacted and briefed as early as possible to ensure their timelines align with the other materials arriving and don’t cause delay to the prototype assembly starting.
On the hard goods side, once the CAD is updated and the test prints are signed off, the final prints for this prototype will be ordered and the supplier will be managed by the designer to answer any questions throughout and ensure that they are delivered to the spec and in a timely manner.
3. Materials and parts inspection:
Initial inspection of parts and materials will be carried out to ensure they have been supplied and produced correctly. Printed parts are tested on arrival and before being assembled to checkhey are performing as intended.
If errors are found, the process of correcting them ensues with the supplier. This can include updates to the CAD or providing extra files such as artwork to the supplier to reproduce parts from. If fabrics arrive faulty, low quality or in a different colour, they are returned and alternatives sourced to ensure that the Mark 1 prototype is up to standard.
While these are unlikely to be the exact fabric used in production (it wouldn’t be logical for a factory in the far east to source a fabric from the UK if they had the same from a supplier nearby), it is important for us to build the Mark 1 prototype as close to the intended material pallet to ensure that the fabrics, trims and components are supporting the products functionality and not hindering it. It can also change the intended construction so inspecting the materials as they arrive means we can adapt the construction and pre-empt problems before they arise.
Planning Assembly
1. Review Assembly Plan
List out plan of approach for construction including necessary prep. This is crucial as sometimes we have one shot or cannot go back a step once parts are assembled. This can be because of the materials such as leather which once perforated will show the holes and so unpicking is no longer an option, or press fits which are designed to lock once pressed in.
2. Consider any changes to the plan once materials arrive.
Fabrics could arrive that fray more than expected and this dictates that all raw edges will need overlocking before assembling to ensure they do not fray over time and seams are durable.
3. Ensure construction techniques are in line with manufacturing practices
One of the key differences of our experienced designers creating a prototype is that they are trained to consider manufacture at every step of the design. This means that design features and designs are only included which will be feasible at manufacture. An example of this is on the textile side, hand stitching is avoided as much as possible as this creates a high labour cost and instead our designers are challenged to consider their assembly plan and overall construction to ensure that hand stitching is minimised, and production optimised.
Assemble and Test
Make prototype using construction techniques with manufacture in mind. Test throughout to ensure it is performing. Testing focuses on core functionality to ensure the prototype handed over at the end works. Further testing is then carried out by client and target market to gather feedback.
Concept to Reality
Taking a design from 2D to 3D is crucial. It allows you to see, feel, use and wear it in the real world. Until now this has been explored in theory in the design stages and each element has been considered independently in a proof of principle prototype. But the Mark 1 prototype is the first time the product is made as a whole, with each element as it is intended to be, and put together into its assembly. Therefore, it allows us to continue to assess each element individually, but more importantly see how each element is working together within the assembly.
A great example of this is when a hard goods product needs to hold a person’s weight. It can be designed on CAD in theory, separate parts could be printed and tested in the proof of principle prototype, but until they are assembled together and physically sat on, you cannot fully predict how each part will work together to hold the person’s weight and accommodate the person shifting their weight.
Intended material palette
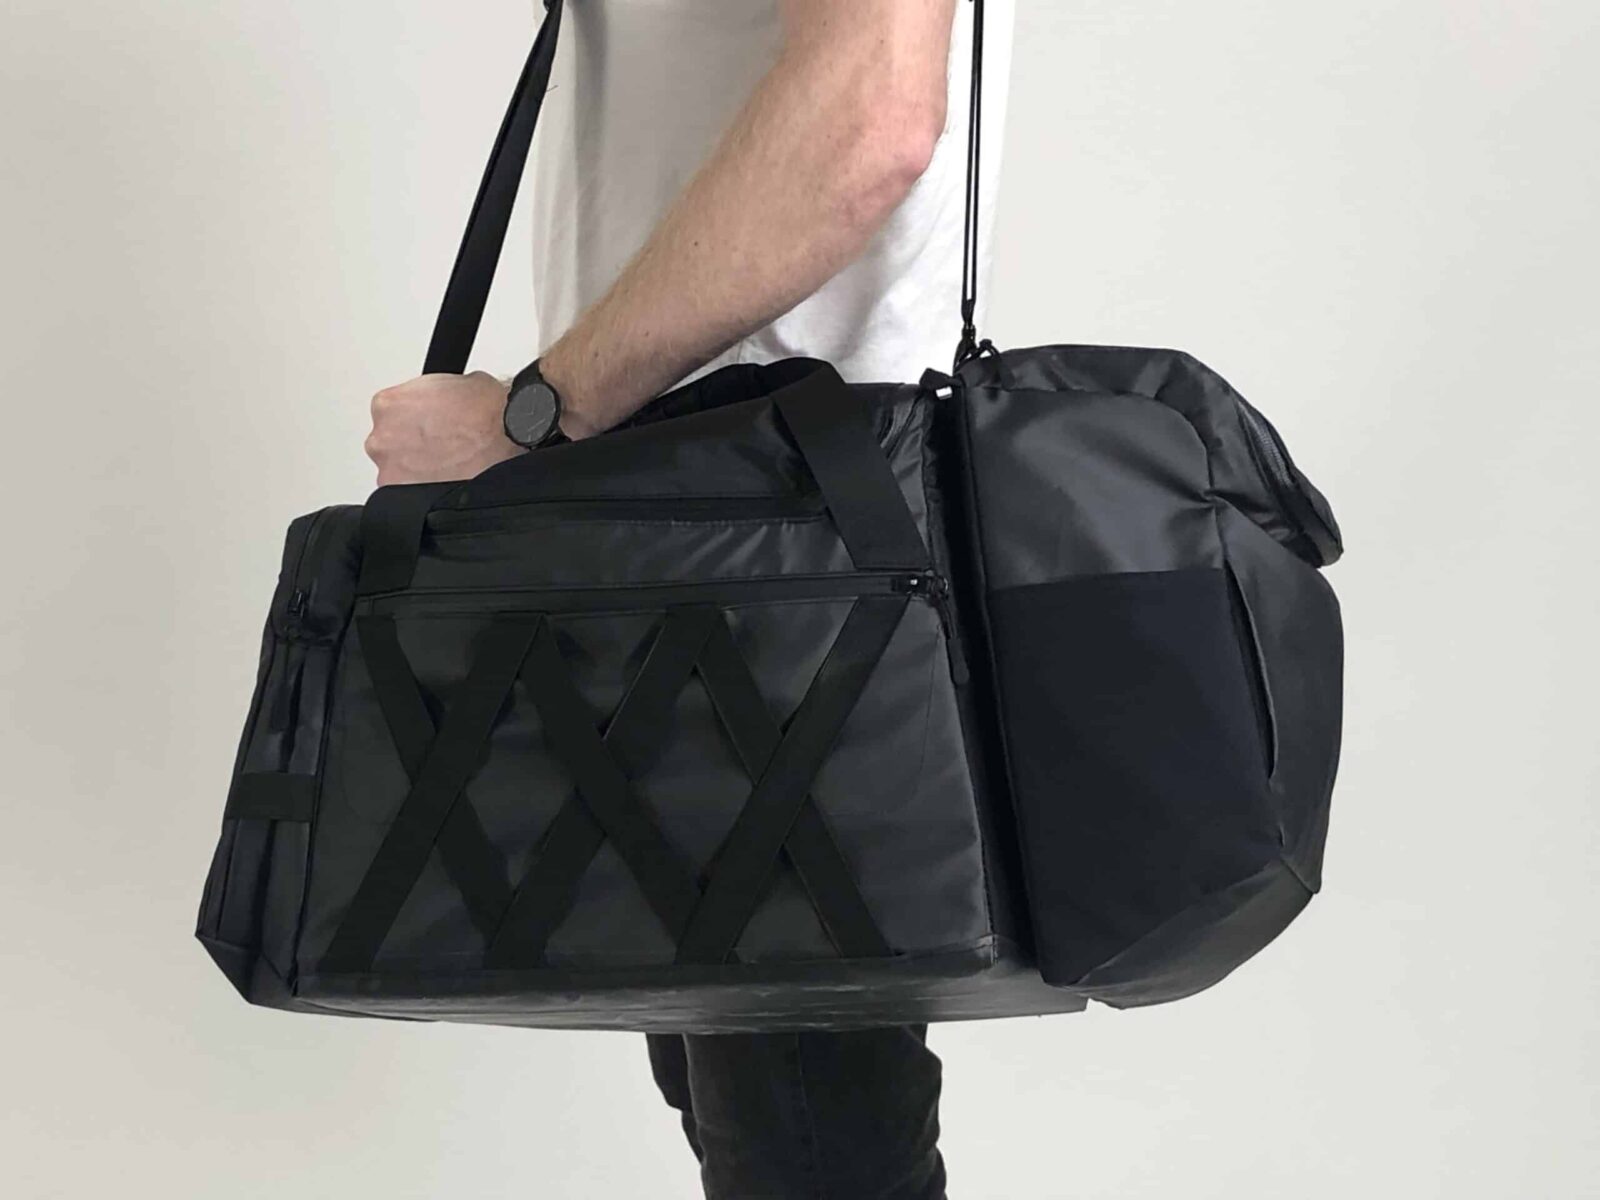
Often proof of principle prototypes will be made from mock up or substitutions in order to avoid supplier lead times or minimum order quantities. Sometimes it is simply to focus on other areas of the design. However, the Mark 1 prototype is made from the intended material palette to not only evolve the product towards its final design, but also ensure that the intended material palette is working for the product.
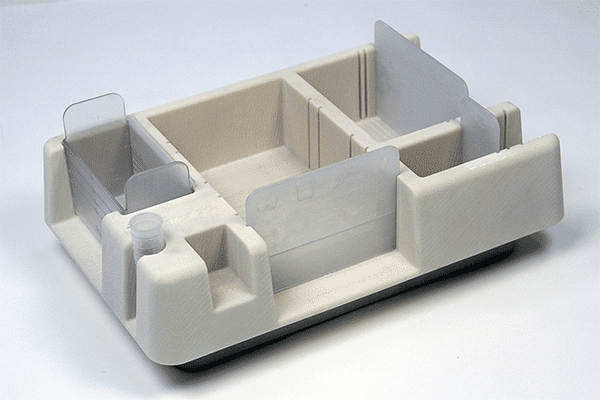
For hard goods products, Mark 1 prototype 3D prints will be printed in the intended material and include finishes such as powder coating and polishing. It’s important to prototype with these finishes applied as they can affect the tolerancing of your tooling which would be a costly mistake to find out later in production.
The same applies to textile products. For example, when a bag is required to hold its shape when empty, mock up materials may be used in the proof of principle prototypes to develop how this structure can be achieved through the bag’s construction. However, until the intended material is used in the intended construction, its weight, body, drape and stretch can all affect this. This could lead to further reinforcements being required or alternatively the fabric may have more structure than predicted and the initial construction technique can be simplified because of this.
User testing and consumer feedback
The Mark 1 prototype can be used to gather consumer feedback. Once people can see and use your prototype, they are far more likely to imagine buying your product. People are visual beings, and while the proof of principle prototype might prove the functionality, people who aren’t familiar with the design will find it hard to imagine what it will look like in its intended material palette or with further refinement. This often affects their feedback on the product up to this point, and therefore seeing a Mark 1 prototype that is more developed and looking similar to what they might expect to buy, no longer requires them to imagine and makes it easier for them to focus their feedback on the product itself and whether they would buy it.
Watching your target market interact and use the Mark 1 prototype sometimes leads to interesting revelations about the user experience which otherwise hadn’t been thought of. For instance, when you have designed a product, the steps to use it are obvious to you as the creator but handing it to your target market without any instruction and observing how they use it can prove that things you thought were intuitive in fact need explaining or highlighting on the product. While this could be achieved through instructions on the packaging, this only benefits the first user of the product, and once that packaging is thrown away the instructions are lost with it. Instead, we’ve found from our approach of prototyping and user testing, that user centred design features can be integrated into the product itself to help educate the user and improve the user experience. This could be as simple as highlighting touch points such as buttons or zips in a contrasting colour, on an otherwise all black product. Or perhaps you watch several people try to press a button which is meant to be turned. Applying a debossed arrow into the CAD of the button means the user can visually see how to operate it but the instructions won’t fade or chip away like a painted arrow might. These design changes begin to consider how the aesthetics can aid the user experience and overall product functionality and thus inform the styling stages. They are simple but could make the difference between a potential customer buying your product.
FAQs
What distinguishes the Mark 1 Prototype from previous versions or iterations?
Previous versions or iterations, such as the proof of principle prototype, will often have focused on the core functionality and be made in mock up materials. It may have only considered parts individually. And so, the Mark 1 prototype brings everything together into one assembly that users can test and provide feedback on without requiring them to imagine or visualise a more refined version.
What are the key features and specifications of the Mark 1 Prototype?
It will have the refinements taken from previous versions applied; it will be made to the intended dimensions; it will be made in the intended material pallete, not only to help gain consumer feedback but also to test that the chosen materials are performing as required; it may have basic styling applied such as preliminary colours and finishes to gain initial feedback from users and check finishes aren’t negatively affecting functionality.
Are there any limitations or known issues with the Mark 1 Prototype?
If the intended material pallete and colours are not available due to supplier minimum order quantities, then we will source as close as possible to ensure the Mark 1 prototype can still be user and functionality tested. While the Mark 1 prototype begins to consider material and colour choices, the temptation to cram styling into the Mark 1 prototype is common and misses one of the key points of the Mark 1 prototype which is to continue to evolve the functionality of the product as a whole assembly and check these material choices and finishes don’t negatively impact on the products functionality. To cram styling in too early runs the risk of having to redo it when the design needs to change to solve a problem with the functionality. Prototyping remains an iterative process and while the Mark 1 prototype is intended to build upon and be a refined version of previous design stages and prototypes, it may well require further stages before it is ready for the styling and manufacturing phase.
How does the Mark 1 Prototype fit into the overall product development timeline?
The mark 1 prototype can be used to test the changes and refinements made to the design since the last design or making stage. Here you are testing if it works and how well it works. It is made from the intended material palette so you can determine how well the materials are working and whether any changes are required now its made from these materials. Lastly it can be used for user testing to see how well they understand the product, how well they use it and what they think of the product now they can imagine owning one, given it now looks and feels similar to the final product. From here, you can build any further feedback into modifications to the prototype, further design development work or use the mark 1 prototype to help you communicate the product to the factory within a manufacturing specification. Sometimes factories may ask to see the prototype for their own reference and understanding of the spec. Finally depending on how close the mark 1 prototype looks to the finished product, some are able to use it for product photography and placement images on websites whilst waiting on factory samples.
What can I use my Mark 1 Prototype for?
The mark 1 prototype can be used to test the changes and refinements made to the design since the last design or making stage. Here you are testing if it works and how well it works. It is made from the intended material palette so you can determine how well the materials are working and whether any changes are required now its made from these materials. Lastly it can be used for user testing to see how well they understand the product, how well they use it and what they think of the product now they can imagine owning one, given it now looks and feels similar to the final product. From here, you can build any further feedback into modifications to the prototype, further design development work or use the mark 1 prototype to help you communicate the product to the factory within a manufacturing specification. Sometimes factories may ask to see the prototype for their own reference and understanding of the spec. Finally depending on how close the mark 1 prototype looks to the finished product, some are able to use it for product photography and placement images on websites whilst waiting on factory samples.
Overview of Mark 1 Prototype
What exactly is a Mark 1 prototype?
A prototype of your chosen concept, with refinements included from previous design stages and prototypes applied. It is in the intended material palette and preliminary colour choices. It is intended to test functionality of the refined design and can be used for user testing to gain insights on user interaction and experience of the product and gain valuable consumer feedback.
Understanding the Value of a Mark 1 prototype
The Mark 1 prototype bring your concept to life as a whole product. Previously parts of the design may have been considered in theory or as separate elements, but the Mark 1 prototype is the first time every element is bought together. Therefore it allows us to test the functionality and check everything is working as it should be. It is made from the intended material palette with finishes applied that allow us to further test these aren’t causing any problems to the product. It also allows the user to physically hold, use and test the product They can easily visualise owning one themselves and therefore can give further feedback on the design without having to “imagine” what the final one would be like.
Here’s Why This Service is Crucial for Your Project:
Within the making of the prototype the designer continually problem solves and evolves the design to ensure the finished prototype works and can be used for testing. There are a million micro adjustments made during the stage which aren’t mentioned or included in the scope but the designers add to ensure the product is always improving. This could include adjusting tolerances on an in-house test print before ordering the final prints to ensure there is no slop, or pinning and trying on a wearable garment to adjust fit before sewing. Our designer’s training and experience is what allows them to make these micro adjustments and decisions quickly and, in contrast to other makers who could produce your prototype for you, it is this experience that pushes them to continually evaluate whether their design decisions will be feasible at manufacture. There would be no point in producing a beautiful, hand crafted wooden box finished with a hand painted logo, or 100% silk pillowcases if your target RRP is £14.99 or your business plan is to provide bulk orders to hospitals for one time uses.
Limitations of service
Prototyping is and always will be an iterative process. Whilst we aim to make as much progress within each stage of work, including the Mark 1 prototype, it is likely that based on testing and user feedback you will find further areas to change and refine after receiving the mark 1 prototype. Therefore, the service does not promise perfection but strives towards a commercially viable and market ready product. It’s bounded in, the same way our designers are conscious of, the reality of production costs, manufacturing constraints and market expectations. The mark 1 prototype is not necessarily ready for production after this stage and many require another round of design, modifications or prototyping before progressing to the manufacturing phase.
Prerequisites
Before engaging in this service, its essential to have a well-documented and tested initial prototype, along with comprehensive feedback from all relevant stakeholders. All this feedback should be fed into a Design for Prototype which has been agreed upon prior to quoting and commencing the mark 1 prototype stage. It outlines the intended material pallet, any changes to the CAD or design, the preliminary colour choices and overall dimensions. This document becomes the specification which the designer follows while producing the prototype. To ensure all time in this stage is efficiently focused on producing the prototype, changes should not be made to the design for prototype after the stage commences, unless it is stated as necessary by the designer. For instance, if the materials arrive and they require a different construction technique or further reinforcements. In this case, the designer will inform you of the design change. The design for prototype document will also help keep the prototype on track and avoid the temptation to add features which could later incur higher production costs or deviate away from the product’s intended purpose.
What comes next
Dependant on the functionality and user testing feedback, you might need modifications to the prototype, further design stages or further prototypes. However, if the feedback is predominantly aesthetics based then you’ve reached a good point to start considering styling and branding stages to develop the aesthetics of the product. This can include developing a house style across a future product range, logo development and how this is applied to the product. More often than not, this can then be communicated to the factory directly through a manufacturing specification and the next version of the product can be made by them as your first sample. This is an efficient way to progress to the manufacturing phase. However, for various reasons clients may require a final prototype sooner, such as presenting to a buyer or showing at a trade show, in which case we can discuss producing this in house with all the styling and branding applied.